一. Tensorflow
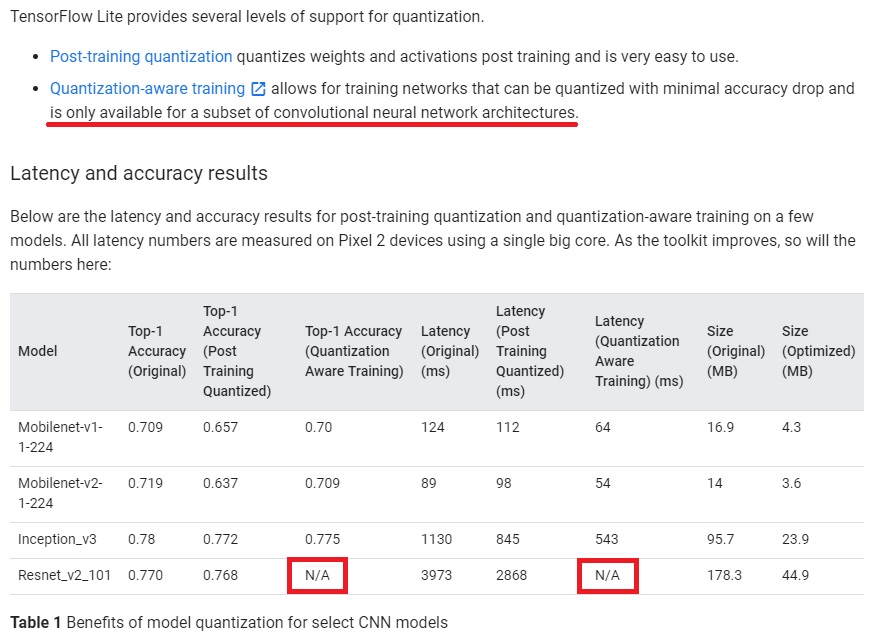
最近研究量化的时候有关注到tflite,于是尝试将模型转换成tflite模型然后丢到c++里跑,其中遇坑无数,首先在tflite官方的文档中指出有两种做量化的方式,其一是Post-training quantization,其二是Quantization-aware training,然后官方文档就轻描淡写地通过放置各种链接把我彻底给搞晕了,然后在各种github上及各种角落里面找到Post-training quantization只针对arm架构的cpu有效,Quantization-aware training则只适用于部分网络结构。

但是但是,我还是手动跑了一遍流程,这里以Post-training quantization为例做一下介绍吧,首先想要获得tflite模型,那么我们先得有一个pretrained模型,假设我们已经有了这样一个模型,那么接下来为了得到tflite模型,你要有pb模型,如果pb模型不是现成的,你只有ckpt文件,那么你需要先从ckpt文件里面把pretrained的变量全部取出以重新保存pb模型文件,在这个过程中为了方便以后调用tflite做预测,你需要先留好输入节点以及输出节点,然后比如你转成pb模型之后,就可以很方便地通过预留的节点进行预测,就像下面这样:
1
2
3
4
5
# 定义输入的张量名称,对应网络结构的输入张量
input_image_tensor = sess.graph.get_tensor_by_name("input_pl:0")

# 定义输出的张量名称,同样对应网络结构的输出张量
output_tensor_name = sess.graph.get_tensor_by_name("convert_outputs/final_output:0")
输入输出节点定义好了以后,于是你就会想要保存pb模型文件了,这里有一个坑就是,保存的时候不能使用tf.graph_util.convert_variables_to_constants这种传统的持久化保存方法,而要使用tf.saved_model.simple_save这个方法去保存pb文件。否则你就会遇到什么Runtime Error: tags什么的找不到这种鬼都不知道的奇葩错误。
保存好了pb文件之后,现在就可以直接使用pb文件做一下预测看能否成功执行,代码如下:
1
2
3
4
5
6
7
8
9
10
11
12
13
14
15
16
17
18
19
pb_file_dir = "..."
image_path = "..."
rst_image_path = "..."

with tf.Session(graph=tf.Graph()) as sess:
    tf.saved_model.loader.load(sess, [tf.saved_model.tag_constants.SERVING], pb_file_dir)
    graph = tf.get_default_graph()
    input_image_tensor = graph.get_tensor_by_name("input_pl:0")
    output_tensor_name = graph.get_tensor_by_name("convert_outputs/final_output:0")

    image_raw_data = Image.open(image_path)
    image_raw_data = image_raw_data.resize((1024, 1024), Image.NEAREST)
    image_raw_data = np.asarray(image_raw_data)
    start = time.time()
    results = sess.run(output_tensor_name, feed_dict={input_image_tensor: image_raw_data})
    print("rate", (time.time() - start))
    results = results.squeeze()
    print(results.shape)
    save_images(results, rst_image_path)
接下来就可以用官方文档中教你的方法将pb模型转成tflite模型,代码如下:
1
2
3
4
5
6
7
8
9
10
11
saved_model_path = "..."
tflite_model_path = "..."

converter=tf.lite.TFLiteConverter.from_saved_model(saved_model_path)
converter.post_training_quantize=True
converter.inference_input_type=tf.lite.constants.QUANTIZED_UINT8
input_arrays = converter.get_input_arrays()
converter.quantized_input_stats = {input_arrays[0] : (0., 1.)}  # mean, std_dev
# converter.allow_custom_ops=True
tflite_quantized_model=converter.convert()
open(tflite_model_path, "wb").write(tflite_quantized_model)
如果正常的话,你应该得到如下类似的结果,以及tflite模型系列文件:
INFO:tensorflow:Restoring parameters from …/save/variables/variables
INFO:tensorflow:The given SavedModel MetaGraphDef contains SignatureDefs with the following keys: {‘serving_default’}
INFO:tensorflow:input tensors info:
INFO:tensorflow:Tensor’s key in saved_model’s tensor_map: input_pl
INFO:tensorflow: tensor name: input_pl:0, shape: (1024, 1024, 3), type: DT_UINT8
INFO:tensorflow:output tensors info:
INFO:tensorflow:Tensor’s key in saved_model’s tensor_map: final_output
INFO:tensorflow: tensor name: convert_outputs/final_output:0, shape: (1, 1024, 1024, 3), type: DT_UINT8
INFO:tensorflow:Restoring parameters from …/save/variables/variables
INFO:tensorflow:Froze 76 variables.
INFO:tensorflow:Converted 76 variables to const ops.
然后你还可以用官方介绍的方法使用python-api进行验证(然鹅我失败了并且获得了一个没有任何信息的segmentation fault):
1
2
3
4
5
6
7
8
9
10
11
12
13
14
15
16
17
18
19
20
21
22
23
24
25
image_path = "..."
tflite_model_path = "..."

# Load TFLite model and allocate tensors.
interpreter = tf.lite.Interpreter(model_path=tflite_model_path)
interpreter.allocate_tensors()

# Get input and output tensors.
input_details = interpreter.get_input_details()
output_details = interpreter.get_output_details()

# Test model on random input data.
input_shape = input_details[0]['shape']
print(input_shape)

image_raw_data = Image.open(image_path)
image_raw_data = image_raw_data.resize((1024, 1024), Image.NEAREST)
image_raw_data = np.asarray(image_raw_data)

interpreter.set_tensor(input_details[0]['index'], image_raw_data)
start = time.time()
interpreter.invoke() # 运行到这里就抛出了segmentation fault
output_data = interpreter.get_tensor(output_details[0]['index'])
print("rate", (time.time() - start))
print(output_data.shape)
于是我想换成c++环境试一下,然后当时看到tflite官方的c++ api文档简直崩溃,这都写了写啥,给了一堆代码,然后不告诉我怎么部署,我怎么运行这一堆破代码啊??于是自己动手吧,了解到需要自己手动编译tensorflow获得需要的库文件,于是download了github版的tensorflow,然后参考了这篇文章,以及这篇文章,当然我混合了一下,在tensorflow/contrib/lite/BUILD中增加如下内容,由于暂时用不到android所以没有管WORKSPACE这个文件:
1
2
3
4
5
6
7
8
9
10
11
cc_binary(
    name = "libtensorflowLite.so",
    linkopts = ["-shared", "-Wl,-soname=libtensorflowLite.so"],
    visibility = ["//visibility:public"],
    linkshared = 1,
    copts = tflite_copts(),
    deps = [
        ":framework",
        "//tensorflow/lite/kernels:builtin_ops",
    ],
)
然后用如下命令bazel build了一下:
1
bazel build -c opt //tensorflow/contrib/lite:libtensorflowLite.so  --host_crosstool_top=@bazel_tools//tools/cpp:toolchain --cxxopt="-std=c++11" --verbose_failures
现在你应该就能拥有tensorflow的各种库文件了,接下来我参考了这篇文章成功跑通了c++的tensorflow,至于前面遇到的那个segmentation fault还没有来得及跟,后面再补上。
二. Pytorch
pytorch跑c++也是相当麻烦,首先参考官方的文档,同样两种方法,一种是tracing,一种是用annotation,用tracing后发现对于upsampling这种操作有bug,在pytorch discuss上讨论说upsampling过程包括控制流,于是不能做到在预测的时候输入图片任意大小,具体原因不明。但这里只讨论tracing方法获得scripted model(因为annotation还不太会用-_-#)。
具体过程还是上代码吧:
1
2
3
4
5
6
7
8
9
10
11
12
13
14
15
16
17
18
19
20
21
22
23
24
25
26
27
28
29
30
31
32
33
34
35
36
37
38
39
40
41
42
43
44
45
46
47
48
49
50
51
52
53
54
55
56
57
58
59
60
61
62
63
64
65
66
67
68
69
70
71
72
73
74
def __make_power_2(img, base, method=Image.BICUBIC):
    ow, oh = img.size
    h = int(round(oh / base) * base)
    w = int(round(ow / base) * base)
    if (h == oh) and (w == ow):
        return img
    return img.resize((w, h), method)

def __scale_width(img, target_width, method=Image.BICUBIC):
    ow, oh = img.size
    if (ow == target_width):
        return img
    w = target_width
    h = int(target_width * oh / ow)
    return img.resize((w, h), method)

def __crop(img, pos, size):
    ow, oh = img.size
    x1, y1 = pos
    tw = th = size
    if (ow > tw or oh > th):
        return img.crop((x1, y1, x1 + tw, y1 + th))
    return img

def __flip(img, flip):
    if flip:
        return img.transpose(Image.FLIP_LEFT_RIGHT)
    return img

def tensor2im(image_tensor, imtype=np.uint8, normalize=True):
    if isinstance(image_tensor, list):
        image_numpy = []
        for i in range(len(image_tensor)):
            image_numpy.append(tensor2im(image_tensor[i], imtype, normalize))
        return image_numpy
    image_numpy = image_tensor.cpu().float().detach().numpy()
    if normalize:
        image_numpy = (np.transpose(image_numpy, (1, 2, 0)) + 1) / 2.0 * 255.0
    else:
        image_numpy = np.transpose(image_numpy, (1, 2, 0)) * 255.0
    image_numpy = np.clip(image_numpy, 0, 255)
    if image_numpy.shape[2] == 1 or image_numpy.shape[2] > 3:
        image_numpy = image_numpy[:,:,0]
    return image_numpy.astype(imtype)

image_path = "..."

model = create_model(opt)

# An example input you would normally provide to your model's forward() method.
example = torch.rand(1, 3, 512, 512)
print(example.dtype)
print(example.shape)

# Use torch.jit.trace to generate a torch.jit.ScriptModule via tracing.
traced_script_module = torch.jit.trace(model, example)
traced_script_module.save("model.pt")

input_img = Image.open(image_path)
# input_img = input_img.resize((1024, 1024), Image.ANTIALIAS)
# input_img_array = np.array(input_img)
# input_img_array = np.swapaxes(input_img_array, 0, 2)
# input_img_array = np.expand_dims(input_img_array, axis=0)
# input_img_tensor = torch.tensor(input_img_array, dtype=torch.float32)
input_img_tensor = torch.unsqueeze(input_img_tensor, 0)

s_t = time.time()
# output = traced_script_module(torch.rand(1, 3, 1024, 1024))
output = traced_script_module(input_img_tensor)
print(time.time() - s_t)
print("output image size", output.shape)
output = output.squeeze()
output = tensor2im(output)
out_img = Image.fromarray(output)
然后可以将pt模型丢到c++上运行,首先需要下载官方文档中提到的libtorch-shared-with-deps-latest.zip,之后可以写c++代码了:
1
2
3
4
5
6
7
8
9
10
11
12
13
14
15
16
17
18
19
20
21
22
23
24
25
26
27
28
29
30
31
32
33
34
35
36
37
38
39
40
#include <torch/script.h> // One-stop header.

#include <iostream>
#include <memory>
#include <time.h>

int main(int argc, const char* argv[]) {
     if (argc != 2) {
        std::cerr << "usage: example-app <path-to-exported-script-module>\n";
        return -1;
    }

    // Deserialize the ScriptModule from a file using torch::jit::load().
    std::shared_ptr<torch::jit::script::Module> module = torch::jit::load(argv[1]);

    assert(module != nullptr);
    std::cout << "ok\n";

    torch::Tensor a = torch::randn({1, 3, 512, 512}, torch::TensorOptions().dtype(torch::kFloat32));
    std::cout << a.sizes() << std::endl;
    std::cout << a.type() << std::endl;

    // Create a vector of inputs.
    std::vector<torch::jit::IValue> inputs;
    inputs.push_back(torch::randn({1, 3, 2048, 2048}, torch::TensorOptions().dtype(torch::kFloat32)));

    time_t startTime = time(NULL);
    time_t c_start = clock();
    // Execute the model and turn its output into a tensor.
    auto output = module->forward(inputs).toTensor();
    time_t endTime = time(NULL);
    time_t c_end = clock();
    std::cout << "clock = " << difftime(endTime, startTime)  << "s" << std::endl;
    std::cout << "clock = " << difftime(c_end, c_start)  << "ms" << std::endl;

    // slice(dim start end)
    // std::cout << output.slice(1, 0, 5) << '\n';
    std::cout << output.sizes() << std::endl;
    std::cout << output.type() << std::endl;
}
CMakeLists.txt文件内容如下:
1
2
3
4
5
6
7
8
9
cmake_minimum_required(VERSION 3.12 FATAL_ERROR)
project(libtorch_test)

set(CMAKE_CXX_STANDARD 14)
find_package(Torch REQUIRED)

add_executable(libtorch_test main.cpp)
target_link_libraries(libtorch_test "${TORCH_LIBRARIES}")
set_property(TARGET libtorch_test PROPERTY CMAKE_CXX_STANDARD 14)
注意在编译的时候要加上libtorch的位置:
cmake -DCMAKE_PREFIX_PATH=/path/to/libtorch/ ..
三. 一点补充:gpu卡号的问题
在使用libtorch的时候遇到一个问题,就是使用pytorch通过jit在使用libtorch的时候遇到一个问题,就是使用pytorch通过jit tracing方式导出的模型会默认绑定tracing的时候使用的gpu卡号,比如在tracing的时候如果使用的gpu 0号卡导出的模型,那么在默认情况下从libtorch导入的模型也是会默认使用gpu 0号卡,如果使用了别的卡号的卡就会报不一致的错误出来,一直被这个问题困扰,觉得pytorch出这种问题也太傻叉了。
巧的是,前两天无意中翻文档,突然发现torch.load的时候有个参数可以变换gpu卡号的绑定问题,那么torch.jit.load是不是也有呢,查了一下,果然有,那么这个参数应该就可以解决这个问题吧,还没试,但感觉是可以的。
最后我继续去调其它bug了…
-The End-